FluxCD Tutorial
Kubernetic now supports managing FluxCD resources. In this tutorial we'll show how to get started with FluxCD to do Continuous Delivery of your workflow and apply GitOps practices.
Getting Started
We'll be following alongside the Getting Started from FluxCD website, you're invited to first do the FluxCD tutorial, but it is not required to be able to follow along here.
Before you begin
To follow the guide, you need the following:
- A Kubernetes cluster. We recommend Kubernetes kind for trying Flux out in a local development environment.
- A GitHub personal access token with repo permissions. See the GitHub documentation on creating a personal access token.
- FluxCD installed on your cluster: See FluxCD guide up to Install Flux onto your cluster step.
Objectives
- Deploy a sample application using Flux Kustomization.
- Deploy a sample application using Flux HelmRelease.
- Perform GitOps using Flux.
Prepare
All FluxCD resources should be created under the fluxcd-system namespace so that FluxCD can read them.
Make sure you selected the proper context (e.g. kind-kind), namespace and then go to the gitrepositories resource.
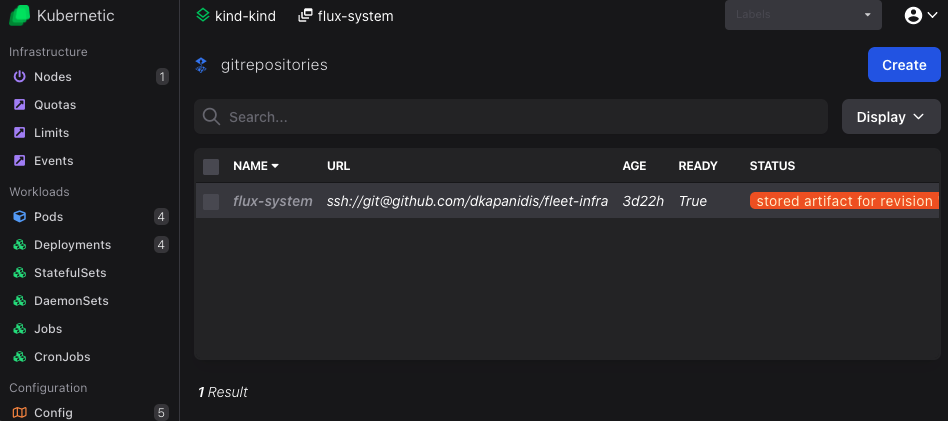
If you installed properly the FluxCD before you should see a flux-system gitrepository that points to your fleet-infra repository.
Deploy a sample application using Flux Kustomization
We'll be deploying an app from a public repository github.com/stefanprodan/podinfo, podinfo is a tiny web application made with Go.
First we need to define our git repository as the source of our deployment. On gitrepositories resources click Create button (or press C) and fill-in the following:
- Name:
podinfo - URL:
https://github.com/stefanprodan/podinfo
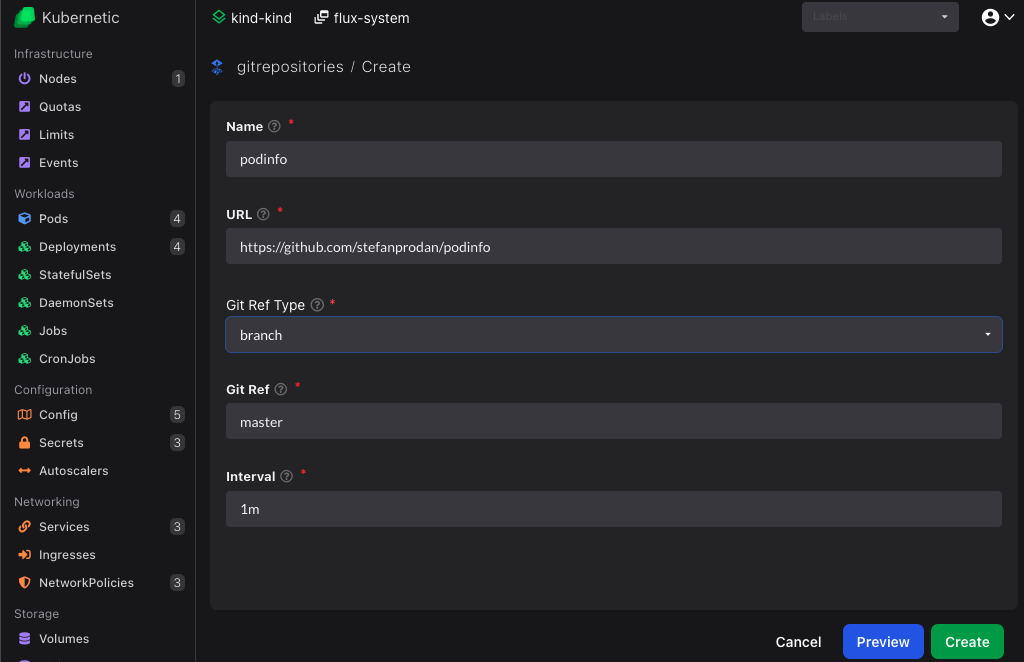
By default the master branch will be monitored, but can be configured otherwise.
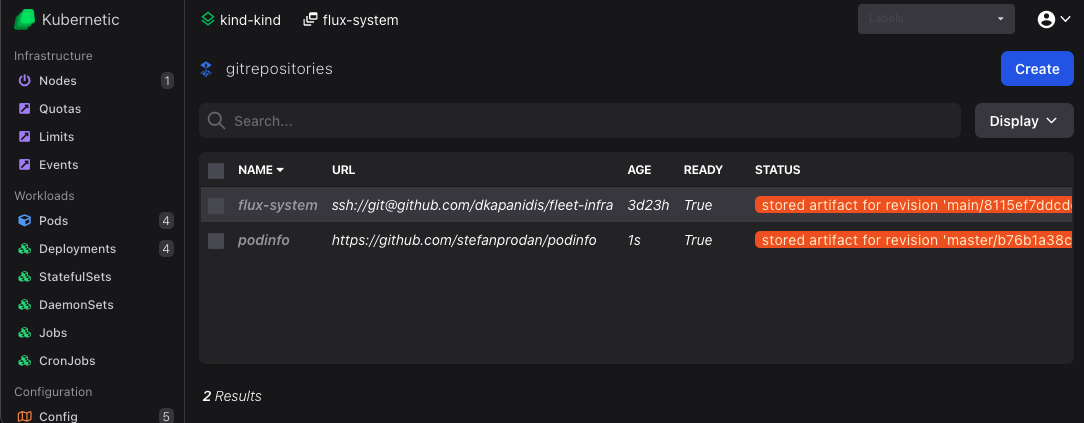
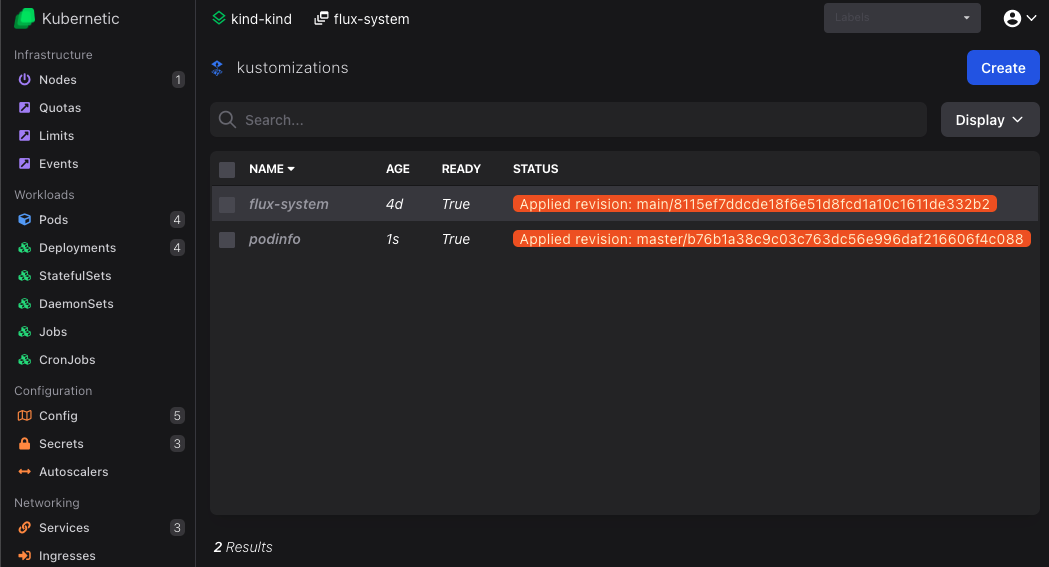
Once created it should be shown as Ready after a few seconds:
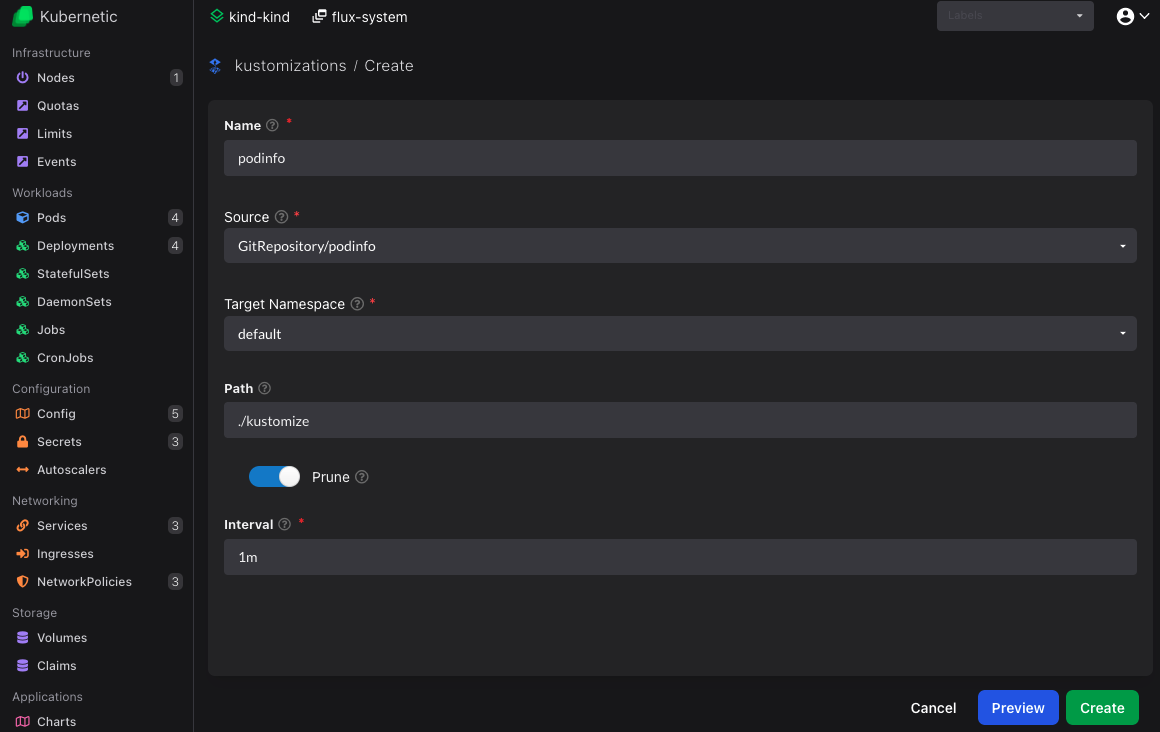
Now let's deploy the app. On kustomizations resources click Create button (or press C) and fill-in the following:
- Name:
podinfo - Source: Choose
GitRepository/podinfofrom dropdown - Target namespace: Choose
defaultfrom dropdown - Path:
./kustomize - Prune:
true
Once created it should be shown as Ready after a few seconds:
Click on the newly created podinfo kustomization to see the resources that are created:
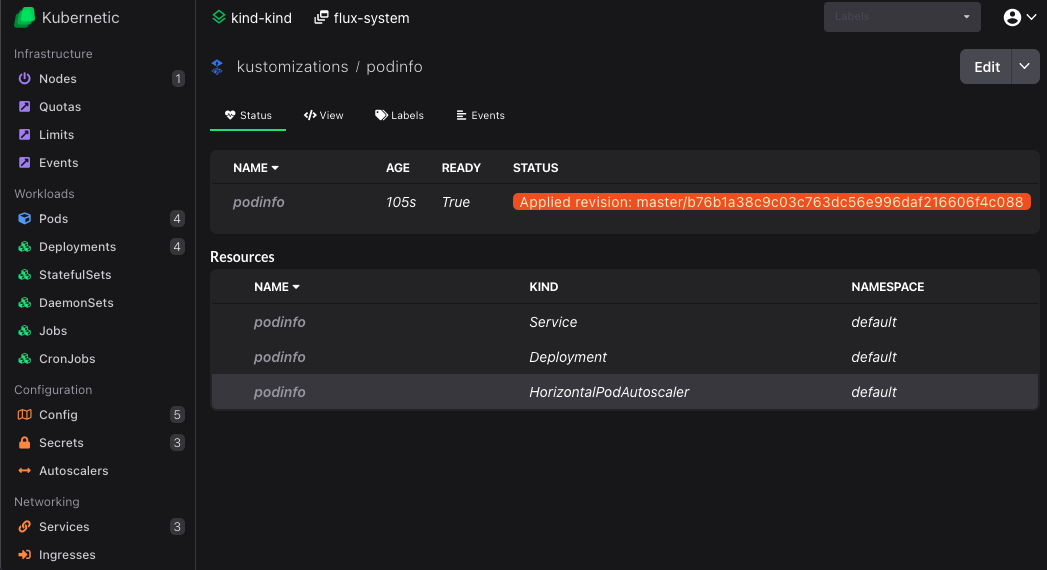
You can now click on each of the created resources to navigate there.
- Click on the
podinfoDeployment to view the corresponding Pods. - Press
Lto view the logs. - Go to
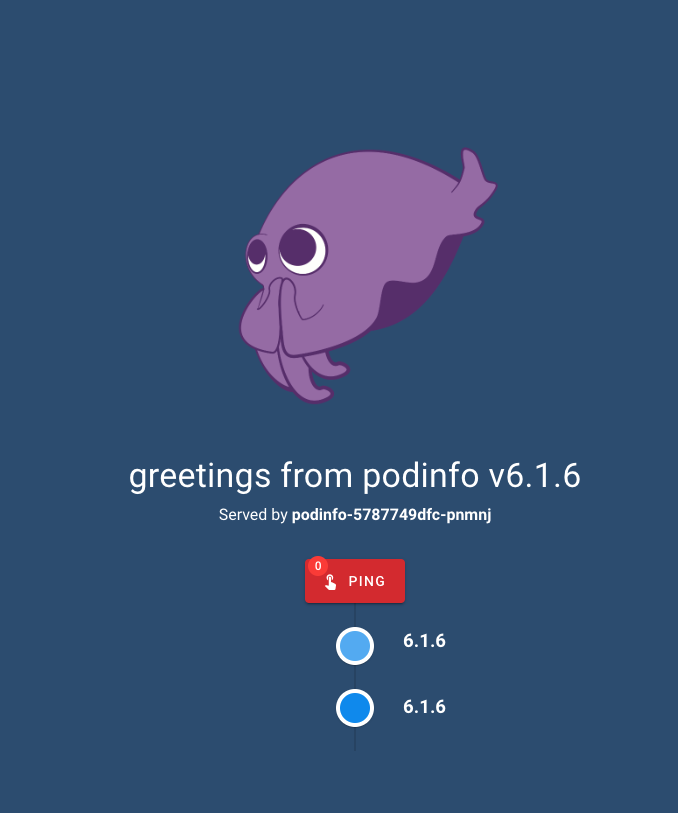
Portstab and port-forward thehttpport (right click > Start Port Forward). - Click on the Local Port to open on a browser.
Let's cleanup everything until now.
- Stop Port Forward.
- Go to
kustomizationsand deletepodinfo. With prune enabled it will delete all generated resources. - Go to
gitrepositoriesand deletepodinfo.
Deploy a sample application using Flux HelmRelease
We can also deploy the app using a Helm chart. The podinfo contains also a chart we can use.
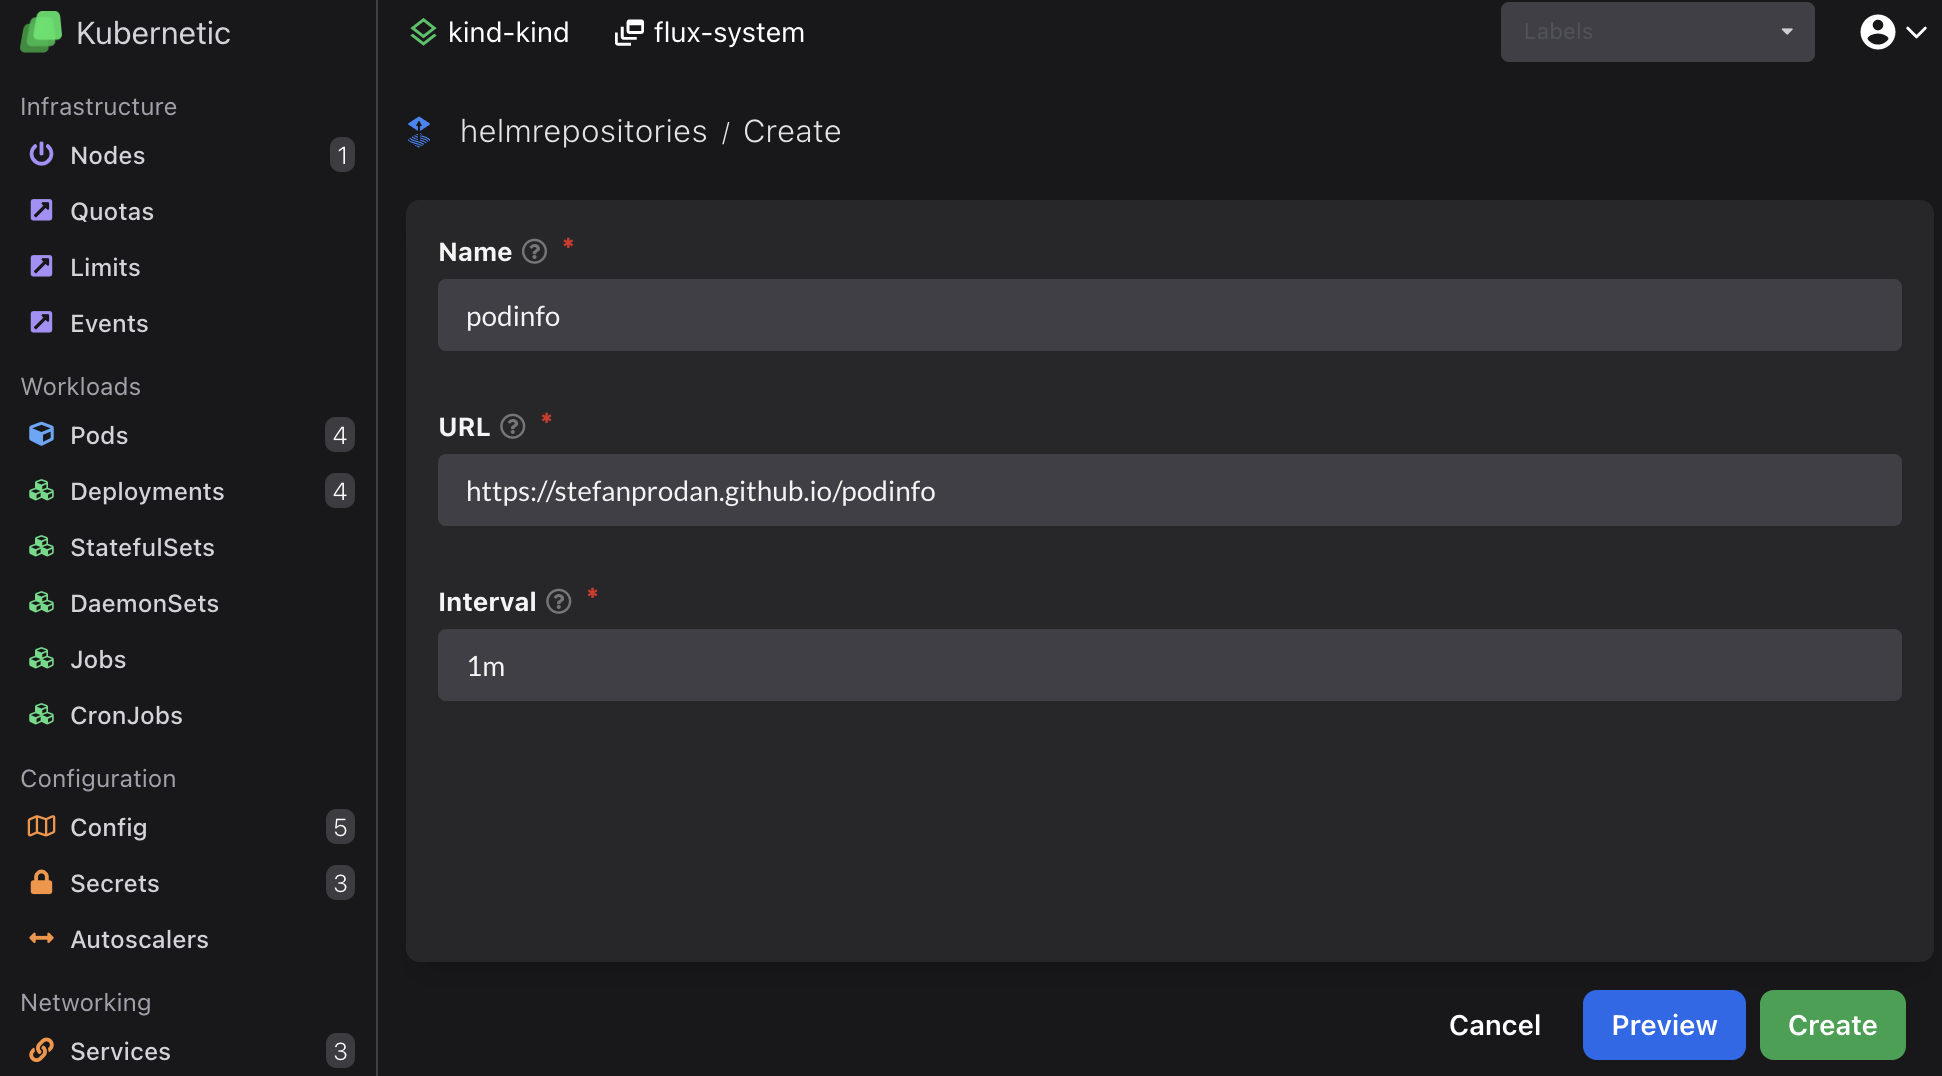
First we need to define the source of the helm repository. On helmrepositories resources click Create button (or press C) and fill-in the following:
- Name:
podinfo - URL:
https://stefanprodan.github.io/podinfo
Once created it should be shown as Ready after a few seconds:
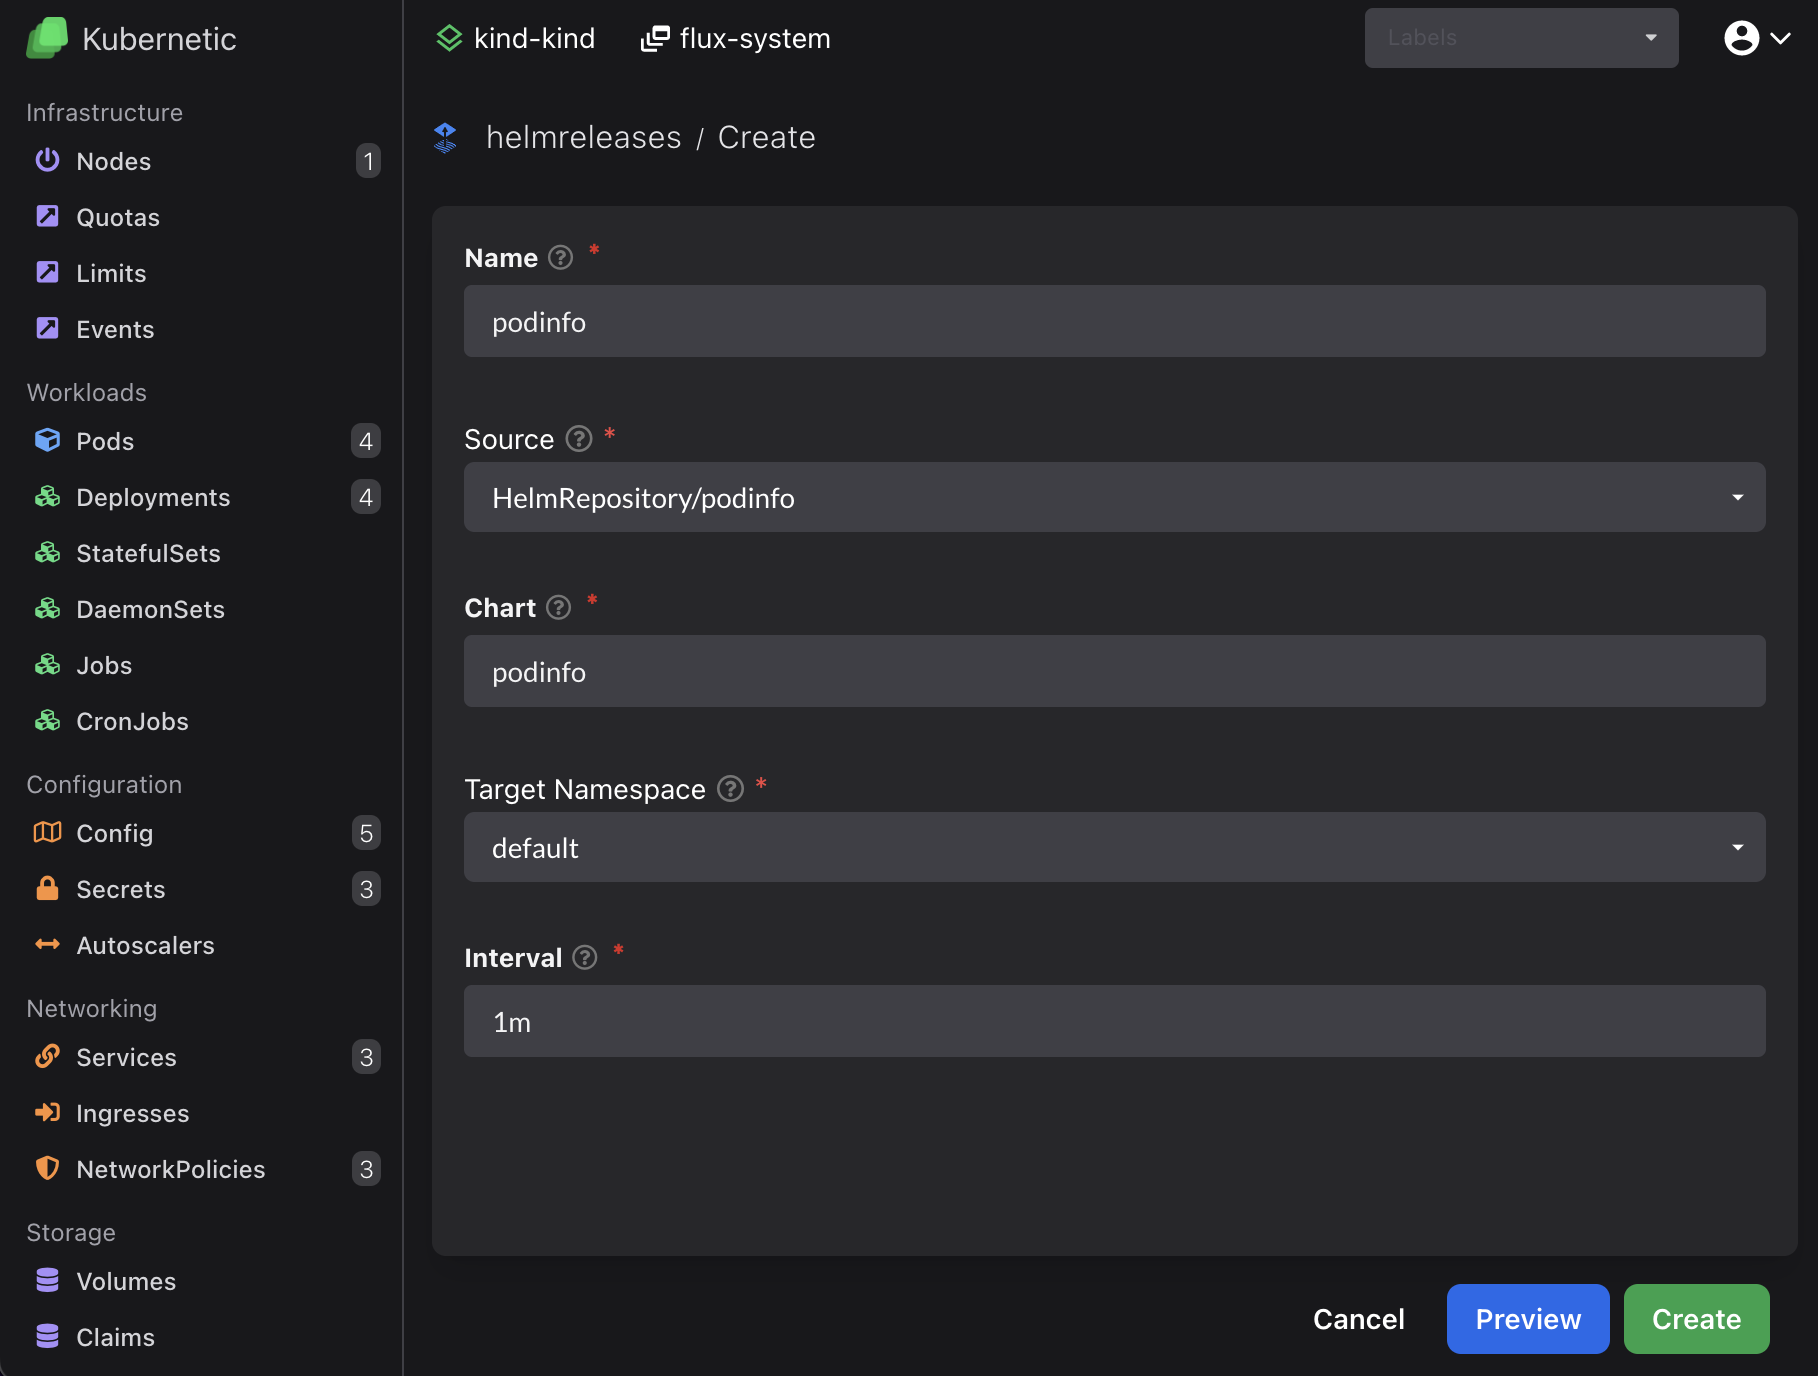
Now let's deploy the app. On helmreleases resources click Create button (or press C) and fill-in the following:
- Name:
podinfo - Source: Choose
HelmRepository/podinfofrom dropdown - Chart:
podinfo - Target namespace: Choose
defaultfrom dropdown
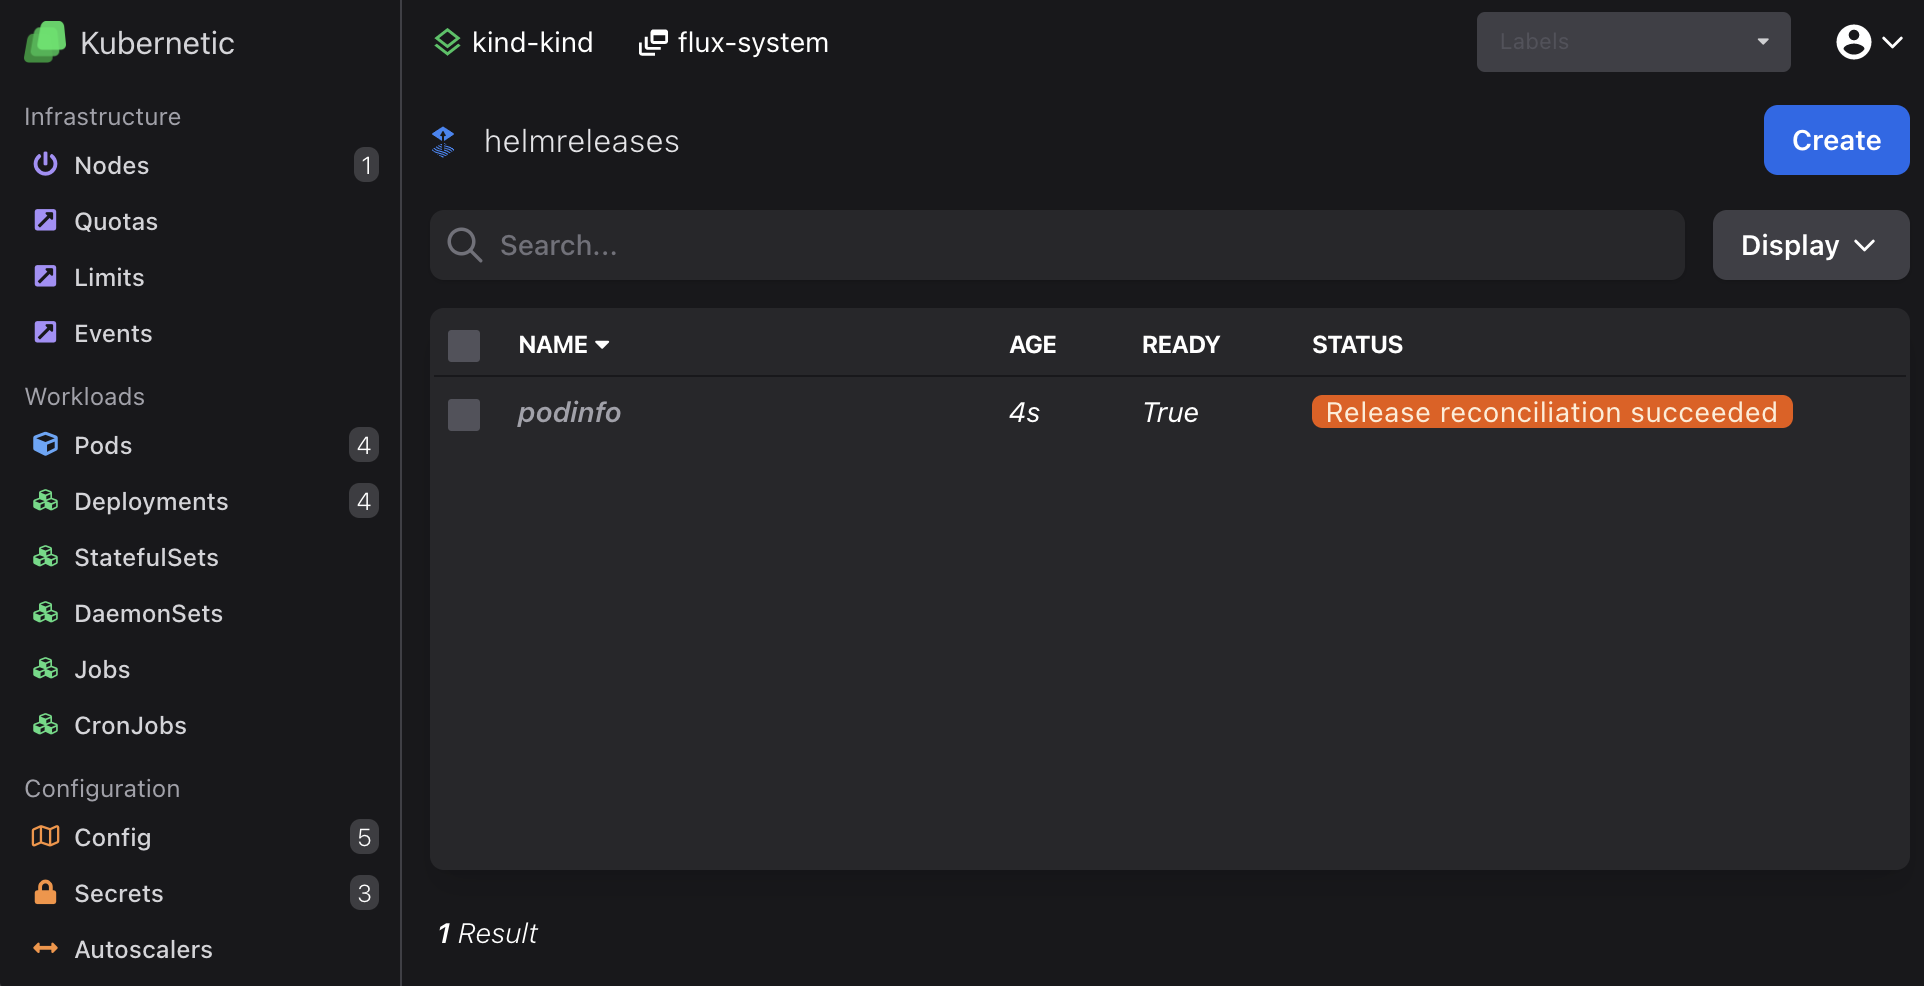
Once created it should be shown as Ready after a few seconds:
You can now go to default namespace and view deployments.
- Click on the
default-podinfoDeployment to view the corresponding Pods. - Press
Lto view the logs. - Go to
Portstab and port-forwardhttp(right click > Start Port Forward) - Click on the Local Port to open on a browser.
Let's cleanup everything again.
- Stop Port Forward.
- Go to
helmreleasesand deletepodinfo(It will delete all generated resources). - Go to
helmrepositoriesand deletepodinfo.
Perform GitOps using Flux
Until now we created manually the Flux resources directly to Kubernetes but we didn't engage with any GitOps practices. Now we'll perform the same process as before but the resources will be stored in a Git repository and FluxCD will pull the resources from there.
You should already have a fleet-infra repository on your GitHub, we'll add the resources there.
On gitrepositories resources click Create button (or press C), fill-in the following and click Preview:
- Name:
podinfo - URL:
https://github.com/stefanprodan/podinfo
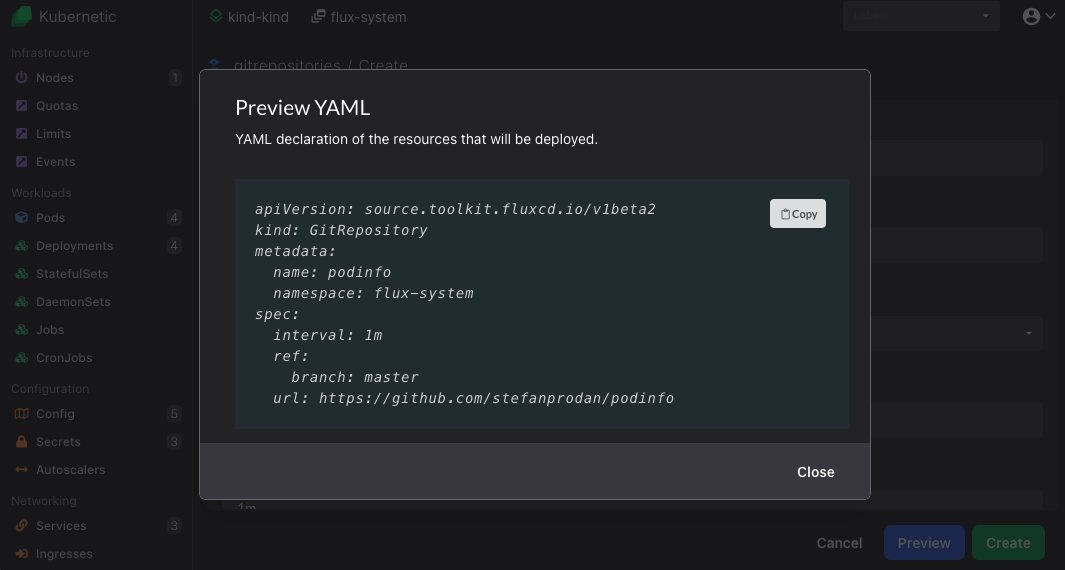
Click Copy to copy the YAML and store it inside fleet-infra repository under ./clusters/my-cluster/podinfo-source.yaml:
Commit and push the podinfo-source.yaml file:
git add -A && git commit -m "Add podinfo GitRepository"
git push
On kustomizations resources click Create button (or press C), fill-in the following and click Preview:
- Name:
podinfo - Source: Choose
GitRepository/podinfofrom dropdown - Target namespace: Choose
defaultfrom dropdown - Path:
./kustomize - Prune:
true
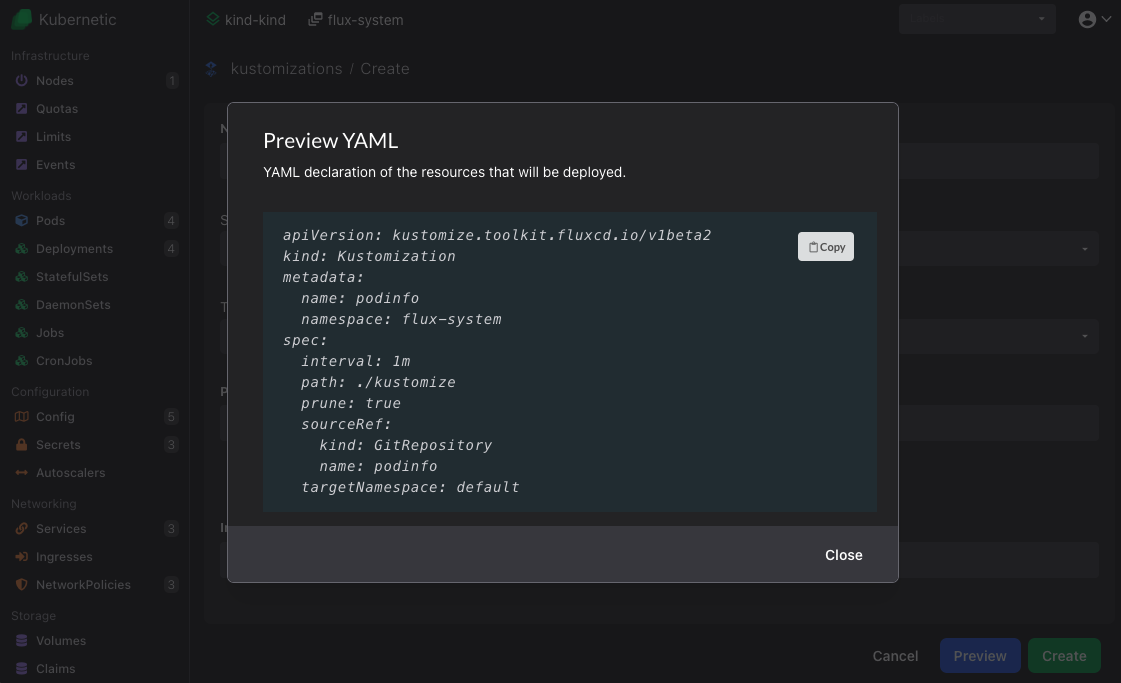
Click Copy to copy the YAML and store it inside fleet-infra repository under ./clusters/my-cluster/podinfo-kustomization.yaml
Commit and push to the repository:
git add -A && git commit -m "Add podinfo Kustomization"
git push
Wait for reconciliation and once created it should be shown as Ready after a few seconds:
Click on the newly created podinfo kustomization to see the resources that are created:
You can now click on each of the created resources to navigate there.
- Click on the
podinfoDeployment to view the corresponding Pods. - Press
Lto view the logs. - Go to
Portstab and port-forward thehttpport (right click > Start Port Forward). - Click on the Local Port to open on a browser.
Summary
We created a GitRepository to connect to a public repository where a sample application is located and then deployed it using Kustomization to our cluster.
We also created a HelmRepository to connect to a Helm repository a public HTTP Server that houses an index.yaml of charts. We then created a HelmRelease to deploy the sample app using a Helm chart.
Lastly we commited all our configuration to a fleet-infra repository, so that Flux pulls the configuration from the repository and syncs the cluster applying GitOps practices.