
Deploy Kubernetic on-premises and secure it using Identity-Aware Proxy.
Last week we released Kubernetic 3.1.0 the desktop edition of a single-pane of glass to manage your kubernetes resources. Today we’re releasing the Kubernetic Team edition, deployed on-premises on your own cluster, and we’ll go through the process of securing the installation using Google Cloud’s Identity-Aware Proxy (IAP.
Identity-Aware Proxy (IAP)
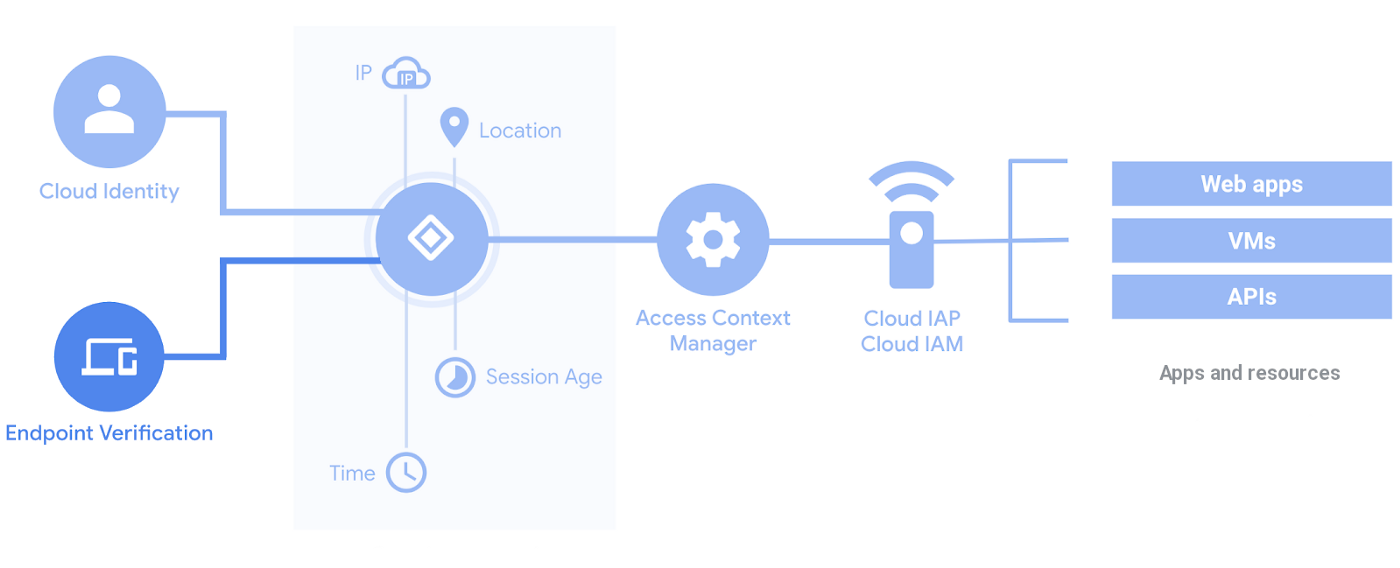
Kubernetic, by default doesn’t provide authentication mechanism, instead it relies on setting up authentication and authorization mechanism layers on top and retrieves the user identity from there. One way is to use Google Cloud’s IAP which enables a zero-trust security model without VPNs. It’s an implementation of BeyondCorp model that shifts the security from network perimeters to individual users and uses context to determine access. In our case we’ll secure Kubernetic with multi-factor authentication layer so that only authorized users can access our endpoint. Then we’ll configure two separate users, one with cluster-admin privileges and one with view privileges.
Step By Step Tutorial
Before we dive into the details, there are some requirements to follow this tutorial:
- A GCP project.
- A domain.
gcloudinstalled locally and authenticated.kubectlinstalled locally.helm (v3)installed locally.
At the end of the tutorial we have a cleanup process, don’t forget to execute it to make sure you don’t have extra resources running on your Google Cloud account.
1. Create Kubernetes Cluster
First, make sure you have configured properly your glcoud and it is up-to-date (Update the zone and region to your preferences):
gcloud config set project <PROJECT_ID>
gcloud config set compute/zone europe-west1-b
gcloud config set compute/region europe-west1
gcloud components update
Then, create a cluster and get the credentials for kubectl with the following commands:
gcloud container clusters create kubernetic --num-nodes 1
gcloud container clusters get-credentials kubernetic
2. Deploy Kubernetic
We use helm to install kubernetic as chart, the repository is here. You can find chart documentation in kubernetic subdirectory.
helm repo add kubernetic https://charts.kubernetic.com
helm repo up
IAP on GKE is enabled via GCE Ingress, which means that we need to expose our Kubernetic service as a NodePort for the HTTPS Load Balancer to pass its health checks. We install kubernetic chart with frontend service type to be NodePort (service type is immutable so may need to delete and reinstall):
helm install kubernetic kubernetic/kubernetic \
  --set frontend.service.type=NodePort
Once deployed you can test it by port-forwarding locally the service:
kubectl port-forward svc/kubernetic-frontend 8888:80
Open browser on http://localhost:8888 and you should see the following:

You can stop port-forward now, let’s focus on the authentication with IAP.
3. Create Static IP for Kubernetic
We’ll be using a static IP to point our domain to that IP and consecutively configure our Ingress rule to redirect to our service through IAP. So let’s create the static IP:
gcloud compute addresses create kubernetic-ip --global
Once you create the IP you can retrieve it by doing:
$ gcloud compute addresses describe kubernetic-ip --global
address: 34.120.121.223
addressType: EXTERNAL
...
You can now setup your domain to point to the static IP. From now on we’ll be referring to the domain as kubernetic.example.com (Make sure to update the references with your actual value).
Once your DNS is setup you can verify it responds ok (it may take some time for DNS servers to propagate your change):
$ dig kubernetic.example.com +short
34.120.121.223
4. Setup SSL Certificate
If you already have an SSL certificate for your domain, mount it as Kubernetes secret and skip this section, otherwise we’ll be using Google’s managed certificate to generate the certificate for the domain.
apiVersion: networking.gke.io/v1beta2
kind: ManagedCertificate
metadata:
  name: kubernetic-cert
spec:
  domains:
    - kubernetic.example.com
Save the file as kubernetic-cert.yaml and create the resource.
kubectl apply -f kubernetic-cert.yaml
Finally, you need to verify the ownership of your domain. Use Google’s webmaster tool or register your domain with Google Domains.
The managed certificate will not be generated until an active Ingress is using it so don’t wait for it yet, also it takes ~20 mins to be active once generated but it won’t block our workflow.
5. Setup Ingress
Ingress needs to simply expose the frontend, the frontend in return connects with the backend for API calls and acts as backend proxy.
We create the Ingress:
apiVersion: networking.k8s.io/v1
kind: Ingress
metadata:
  name: kubernetic
  annotations:
    kubernetes.io/ingress.global-static-ip-name: kubernetic-ip
    networking.gke.io/managed-certificates: kubernetic-cert
spec:
  rules:
  - host: kubernetic.example.com
    http:
      paths:
      - backend:
          serviceName: kubernetic-frontend
          servicePort: 80
Save it as kubernetic-ingress.yaml and create the resource:
If you’re using your own SSL certificate use the following configuration:
apiVersion: networking.k8s.io/v1
kind: Ingress
metadata:
  name: kubernetic
  annotations:
    kubernetes.io/ingress.global-static-ip-name: kubernetic-ip
spec:
  tls:
  - secretName: my-cert-secret
  rules:
  - host: kubernetic.example.com
    http:
      paths:
      - backend:
          serviceName: kubernetic-frontend
          servicePort: 80
Once the ingress is healthy, https://kubernetic.example.com should redirect you the the Kubernetic setup screen.
6. Enable IAP
Let’s setup the IAP now, first create configure the OAuth consent screen:
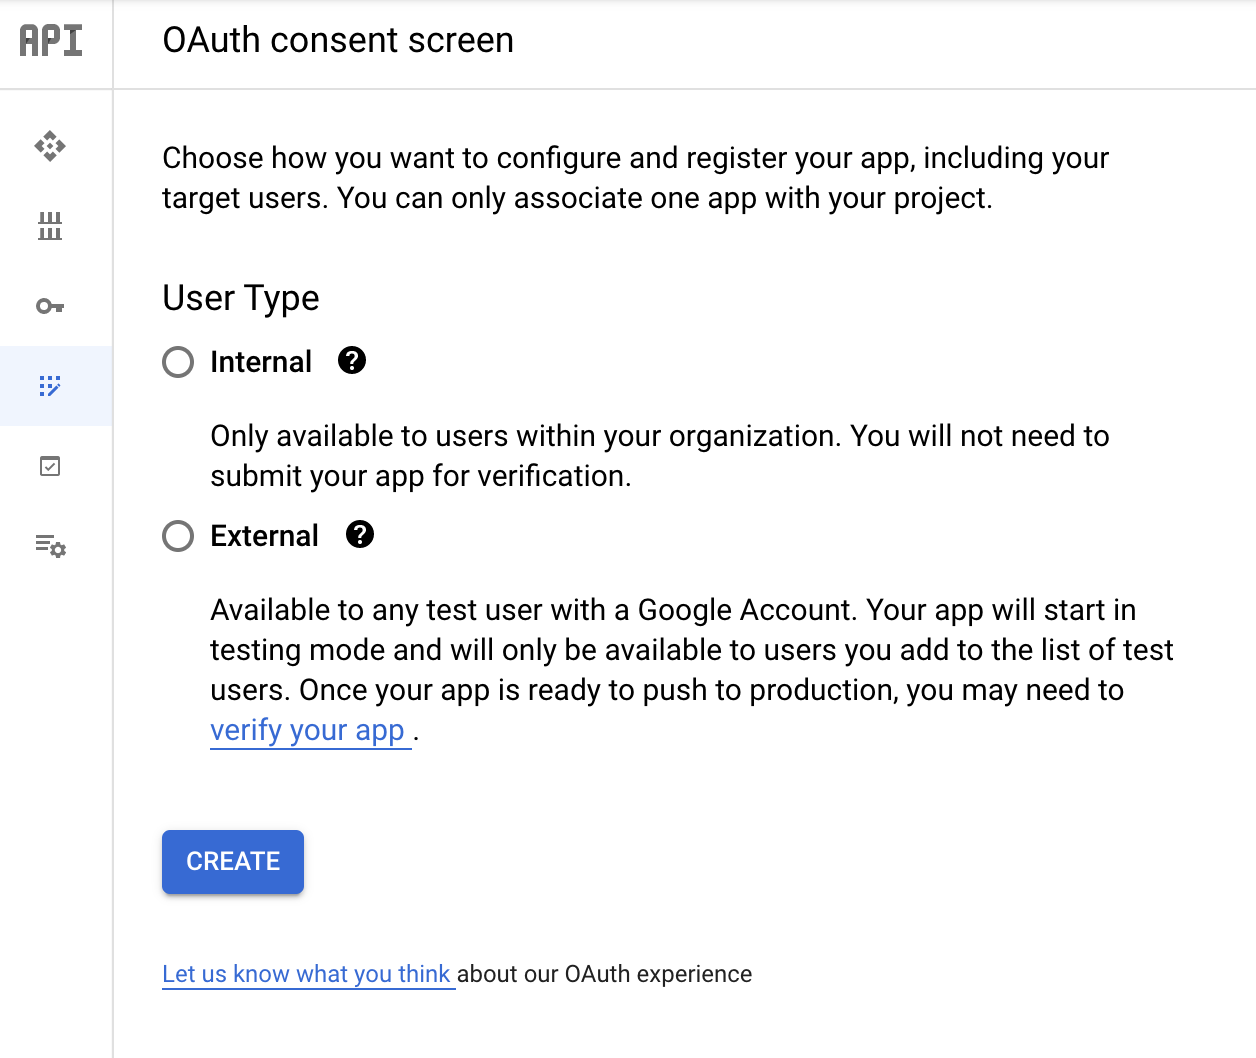
Configure Internal user Type so only users within your organization can login and fill in the rest of the information.
Go to Credentials page and create the OAuth client credentials:
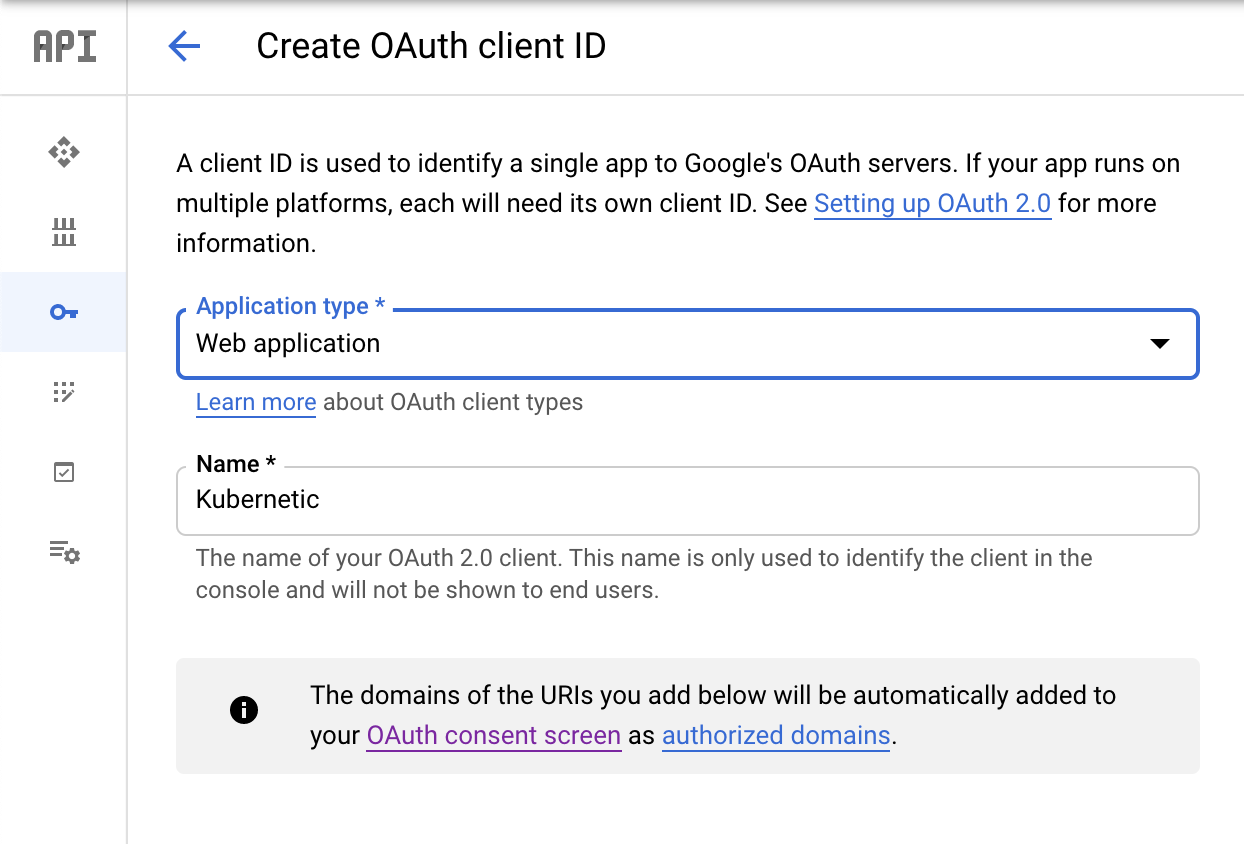
Choose Application type: Web Application and add a descriptive name and click Create. Note down the <CLIENT_ID> and <CLIENT_SECRET> generated.
Go back and edit the same OAuth client adding the following URL to the authorized redirect URIs list:
https://iap.googleapis.com/v1/oauth/clientIds/<CLIENT_ID>:handleRedirect
Now that we have the OAuth client prepared, let’s pass the credentials to the Kubernetes BackendConfig.
Create a secret to with the IAP credentials:
kubectl create secret generic iap-credentials \
  --from-literal=client_id=<CLIENT_ID> \
  --from-literal=client_secret=<CLIENT_SECRET>
Now create the BackendConfig referencing the secret:
apiVersion: cloud.google.com/v1
kind: BackendConfig
metadata:
  name: iap-config
spec:
  iap:
    enabled: true
    oauthclientCredentials:
      secretName: iap-credentials
Create the file iap-config.yaml and deploy it:
kubectl apply -f iap-config.yaml
Finally, we need to add the annotation to the frontend service to associate our new BackendConfig to the NodePort:
config:
  auth:
    type: gke
frontend:
  service:
    type: NodePort
    annotations:
      beta.cloud.google.com/backend-config: '{"default": "iap-config"}'
save as values.yaml and upgrade the release:
helm upgrade kubernetic kubernetic/kubernetic -f values.yaml
Check the Google IAP guide for more details or troubleshooting of IAP.
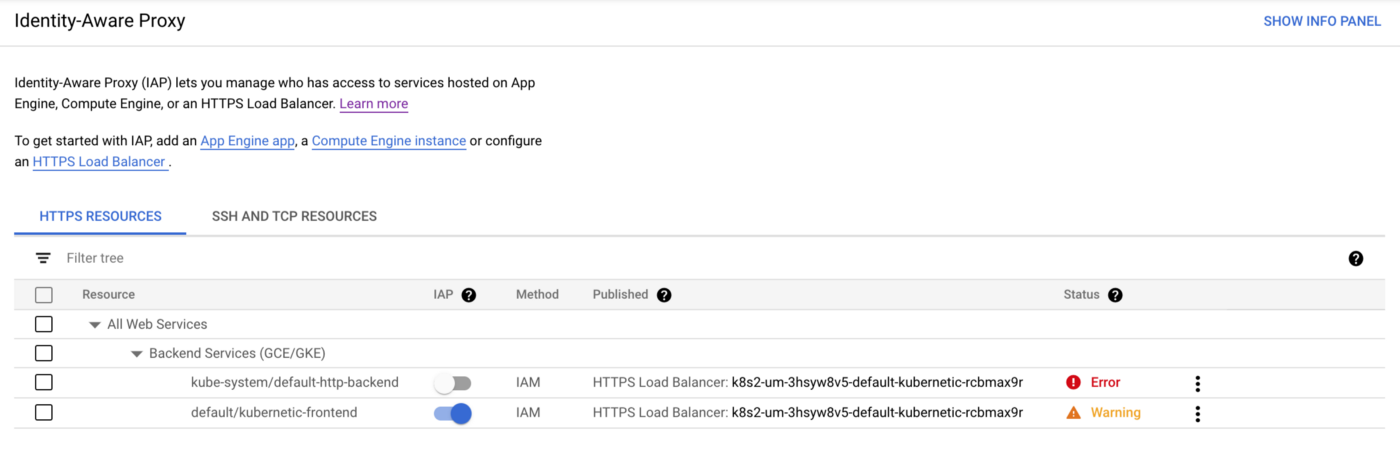
7. Configure IAP access
Navigate on IAP Page and you should now see the kubernetic-frontend service. Click on the IAP toggle button to turn on IAP.
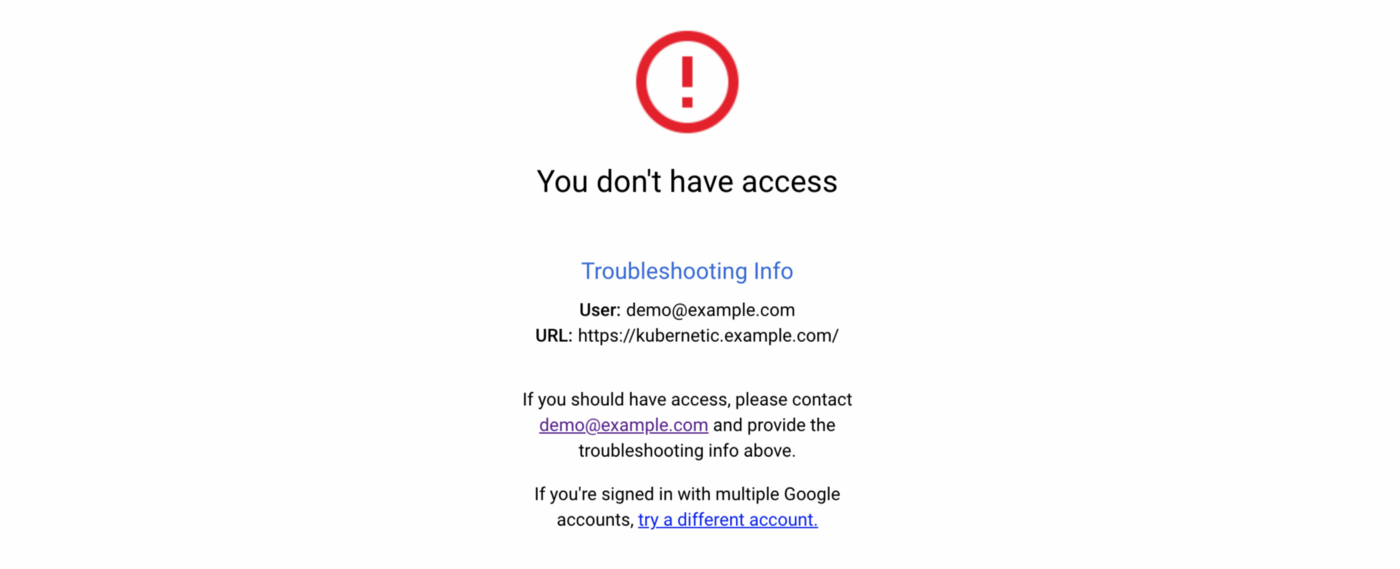
Now if you try to access the URL and you will be asked to authenticate with your Google credentials and be denied access:
To provide access, configure IAP to add members with IAP-secured Web App User role:
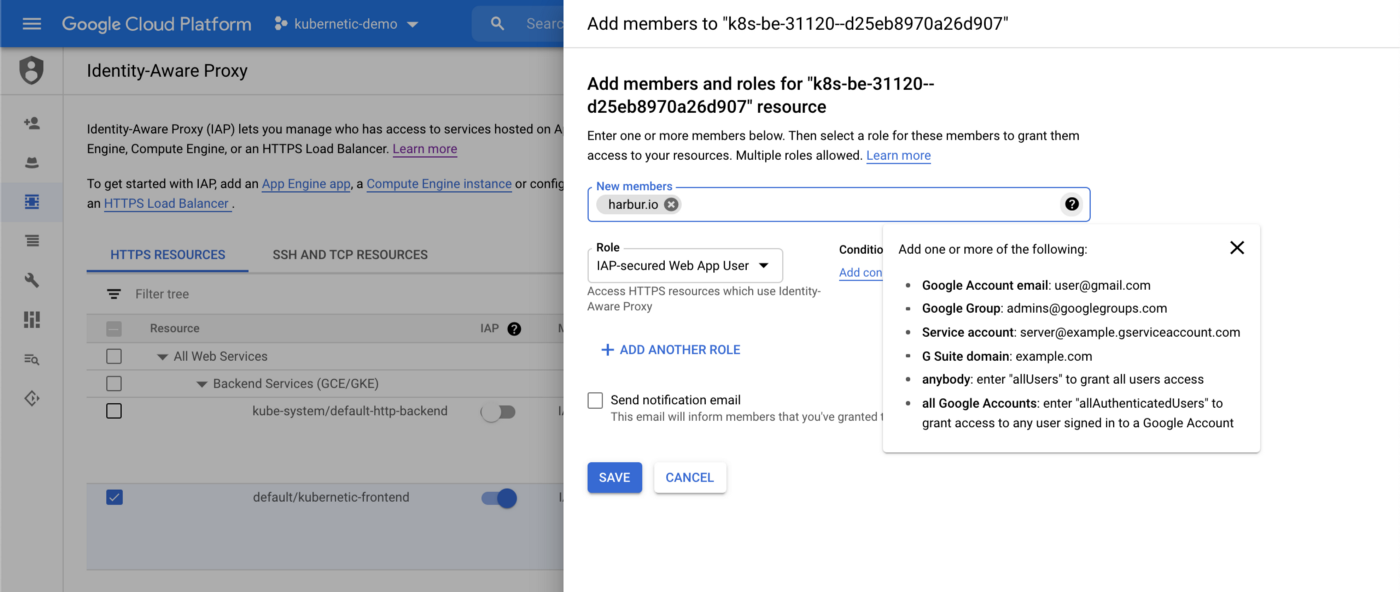
You can either add members individually or grant access to the all organization users, which is what we did in our example.
Now if you try to access the URL you can see the setup screen protected by IAP:
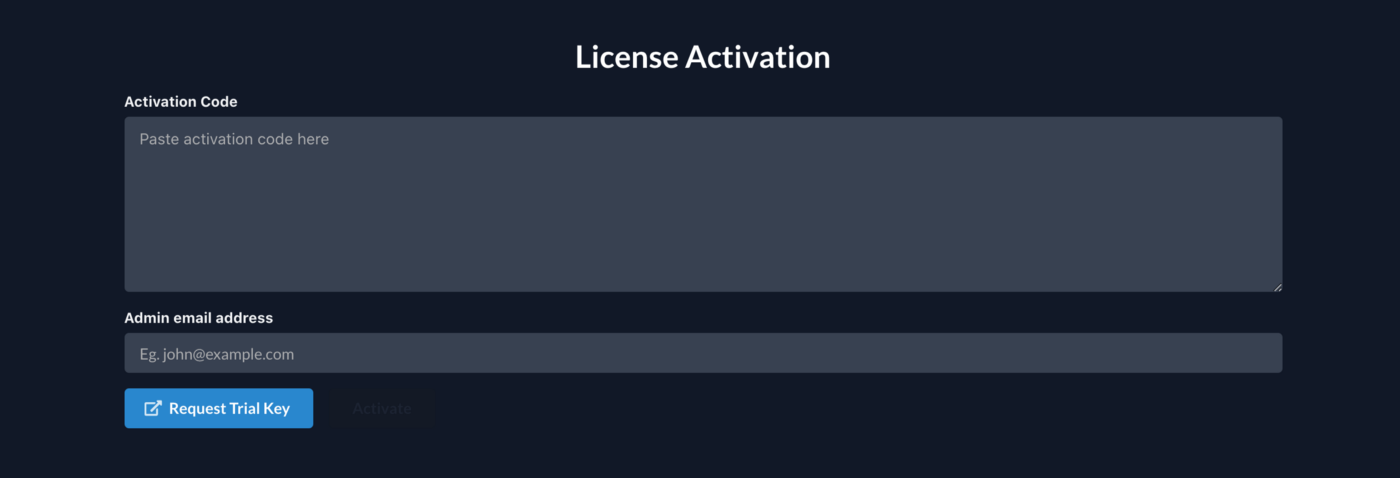
8. License Activation
Now that we have authenticated properly, we can continue with the setup process. You can request a free trial key here, which is valid for 30 days for up to 10 users. Once received, fill in the activation code and add the admin email address (this must match the one you logged in previously on Google, so that you can be granted admin privileges).
9. Setup Kubernetes Privileges
Once you fill-in the activation code you will be redirected to the dashboard, but an error message will appear:
This is because your user doesn’t have any privileges granted in Kubernetes cluster itself.
Since our user is the admin, let’s grant ourselves cluster-admin as an example:
kubectl create clusterrolebinding cluster-admin-binding \
  --clusterrole cluster-admin \
  --user $(gcloud config get-value account)
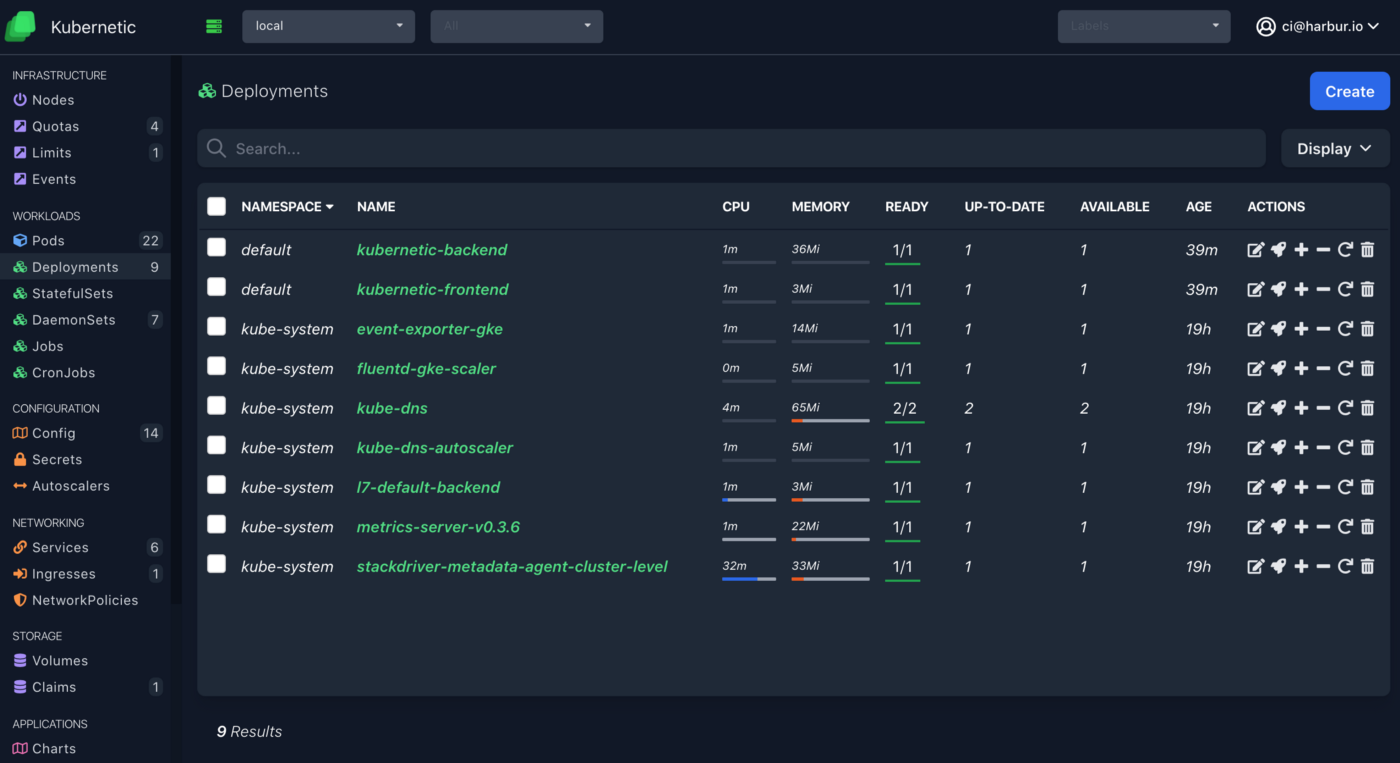
Refresh the screen and you can now access the dashboard and navigate on all resources:


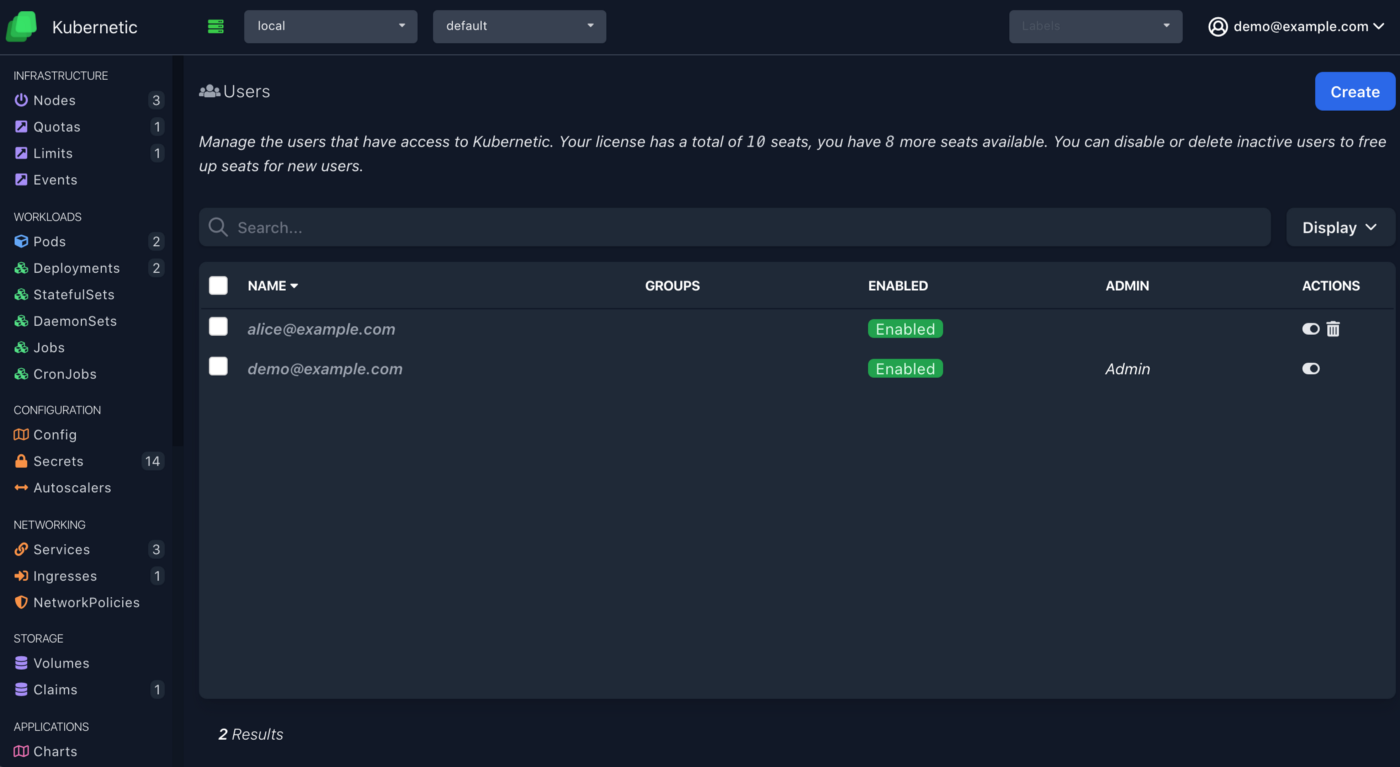
Now, let’s add some more users, go to the Users section on the top right menu, and create a new user filling the email address of the new user. The final result should be like this:
- demo@example.com: our current user with admin privileges.
- alice@example.com: our second user.
Now let’s provide some basic access privileges to the second user:
- discovery: So that he can do discovery of resources on cluster (but not list them yet).
- cluster-wide view: So that user can view common resources on all namespaces (excluding Secrets).
- metrics: So that user can view usage metrics (e.g. CPU, Memory) of resources.
# Grant discovery
kubectl create clusterrolebinding users:alice:discovery \
  --clusterrole system:discovery \
  --user alice@example.com

# Grant view
kubectl create clusterrolebinding users:alice:view \
  --clusterrole view \
  --user alice@example.com

# Grant metrics
kubectl create clusterrolebinding users:alice:metrics \
  --clusterrole system:gke-uas-metrics-reader \
  --user alice@example.com
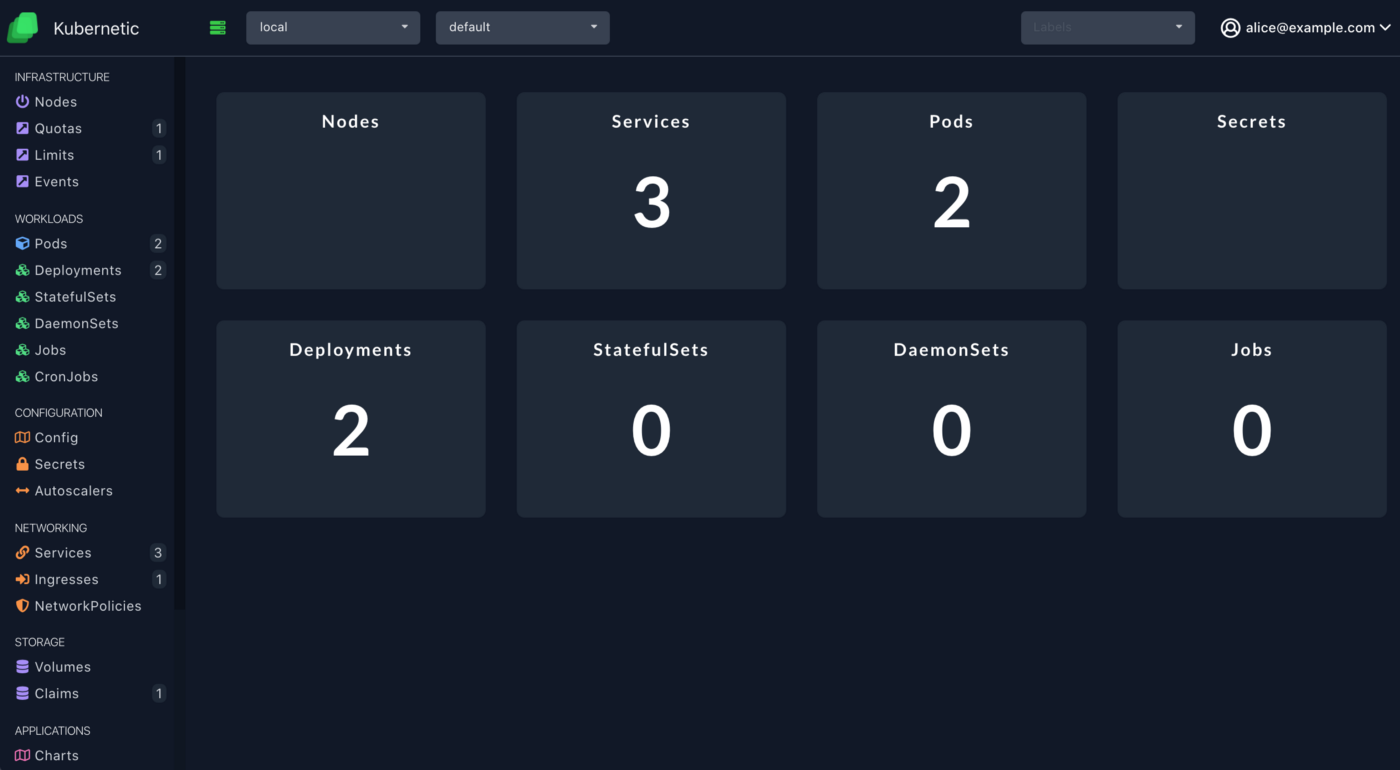
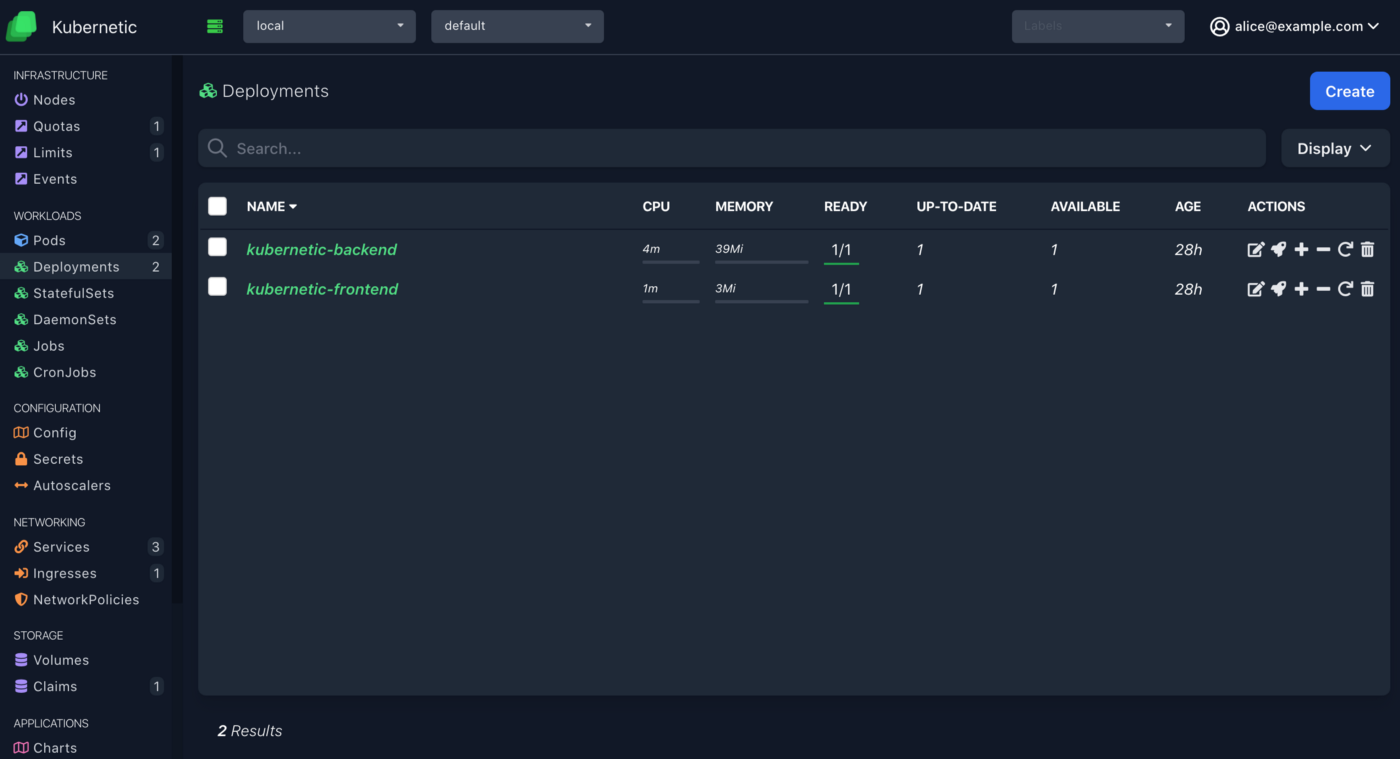
If you login now as the second user (you can use an incognito tab to try it out) you can see some resources, except nodes or secrets which are not included in the view ClusterRole.
Granting Namespace Access
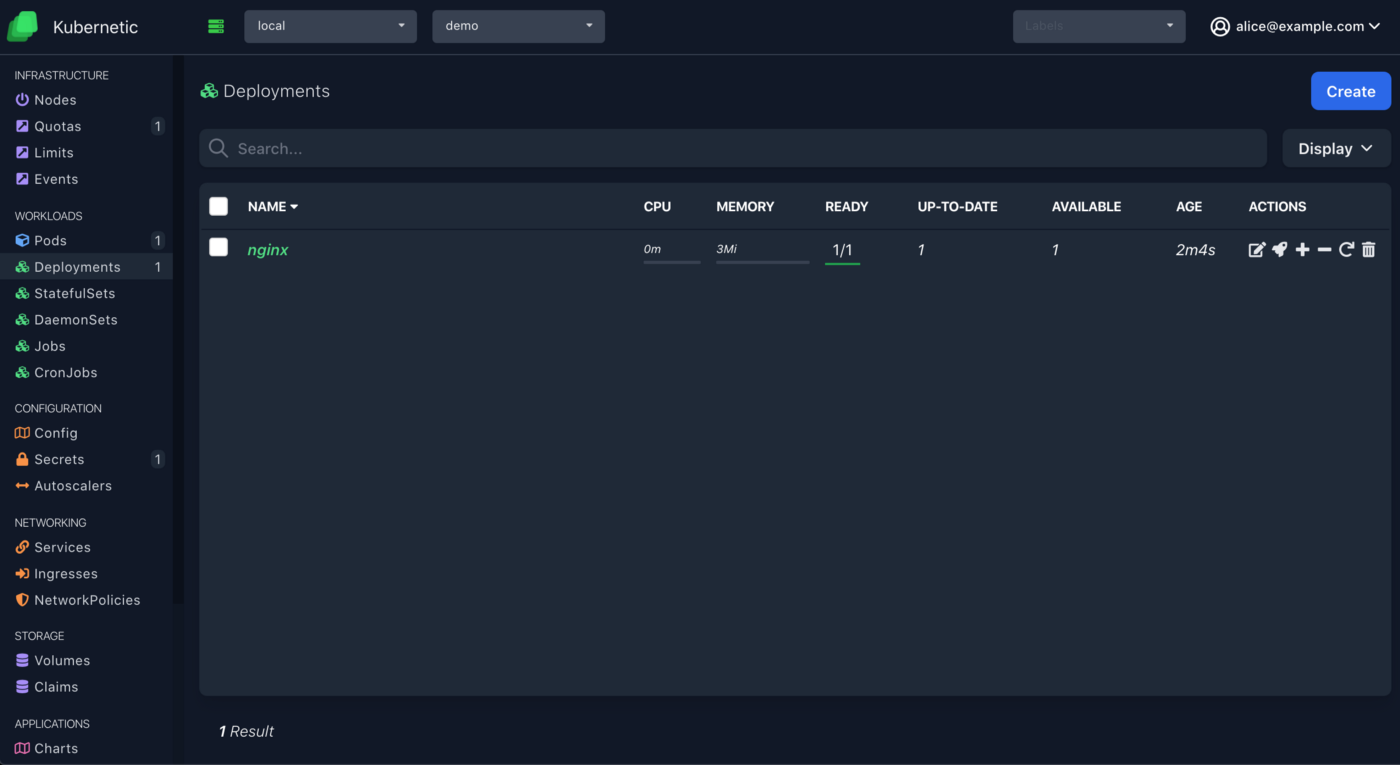
A common use case is to grant access only to specific namespaces for a user, in order to follow the principle of least privilege. Following up in our previous example we can grant admin access to alice@example.com to a fresh namespace demo:
kubectl create namespace demo
kubectl create rolebinding alice \
  --clusterrole admin \
  --namespace demo \
  --user alice@example.com
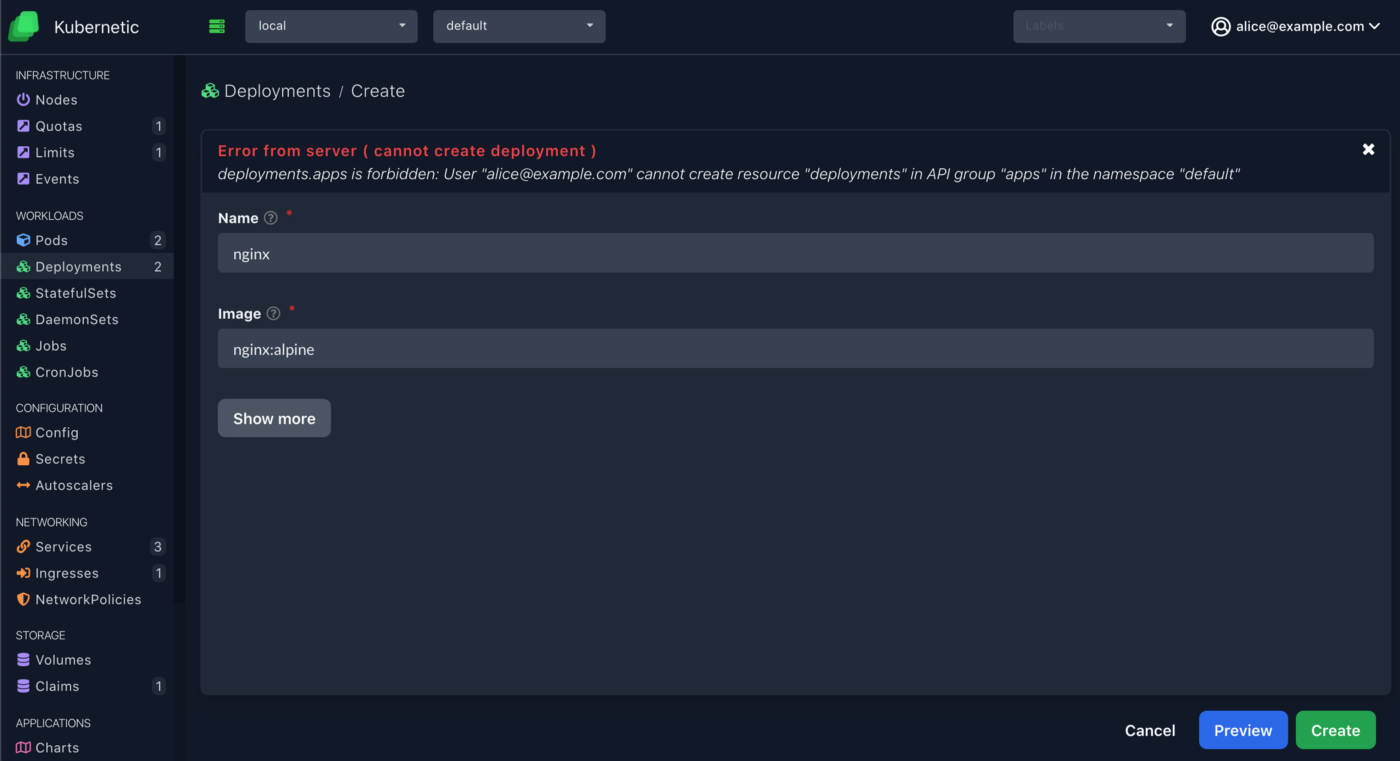
And now alice can manage resources on demo namespace but still not on other namespaces:
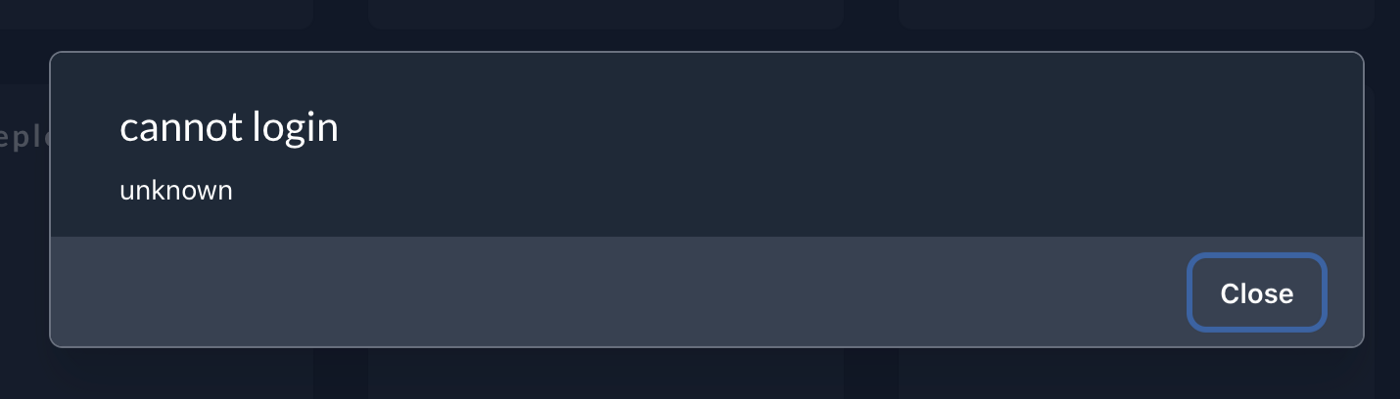
Choose default namespace, go to Deployments, click Create button and fill in name and image, it will display an error message.
Cleanup
If you want to cleanup the resources we created with the tutorial do the following steps:
# delete namespace
kubectl delete namespace demo
# delete clusterrolebindings
kubectl delete clusterrolebindings users:alice:discovery
kubectl delete clusterrolebindings users:alice:view
kubectl delete clusterrolebindings users:alice:metrics
kubectl delete clsuterrolebindings cluster-admin-binding
# delete helm releases
helm uninstall kubernetic
# delete backendconfig
kubectl delete backendconfig iap-config
# delete secret
kubectl delete secret iap-credentials
# delete ingress
kubectl delete ingress kubernetic
# delete managedcertificate
kubectl delete managedcertificate kubernetic-cert
# delete static IP
gcloud compute addresses delete kubernetic-ip --global
# delete cluster
gcloud container clusters delete kubernetic
References
This post is greatly inspired by the integration of Grafana with IAP:
Summary
We did a setup of a Kubernetes cluster on GKE from scratch, configured a domain to point to a running Kubernetic instance inside the cluster, secured it with Google’s Identity-Aware Proxy (IAP) and provided a UI for all authenticated users to manage their corresponding resources on the cluster.
We’ll soon be doing a follow up post how deploy securely Kubernetic on other type of clusters.
Kubernetic is a single-pane of glass for managing your clusters, focused to provide productivity for power users and discoverability for newcomers.